This year, Chalming Cake Designs has had its highest number of weddings (and boy it has been non stop work!), some exciting and different celebration cakes, had designs published in magazines and been apart of 2 weddings that have won weddings of the month/year. We have also moved and are currently creating a new work space that will be solely dedicated to creating cakes in 2017.
But this post isn’t about all the creations that have been baked and designed, I have been doing a different type of baking!
My husband and I are expecting our first Bundle of Joy.
She (yes we are having a little girl!) is due on the 9th November and we absolutely can not wait to meet her!
It is the hardest thing I have ever had to bake and I dont think I have ever been so tired, but when I feel her move it is worth every tired moment!
So as of October I will be taking some time off to put my feet up (I can only hope!), cook and freeze dinners and basically nest in preparation for our gorgeous little girls arrival!
I will be returning to work in June 2017. I will still be taking bookings over my Maternity Leave so that when I return to work I will be lovely and busy, so please dont hesitate to get in touch over this time as I will still be responding to emails if you are looking for a cake from June 2017.
I will however be reducing the amount of orders I take as I still want to make sure that the upmost care and love is taken with creating each order so I would kindly suggest you book early to avoid disappointment.
Well I am so pleased I was able to share our very exciting news with you and I will be sure to introduce her when she finally arrives!
Chalming Wishes
Sonia xxx
A special thanks to Merrie from Merrie & Bright Calligraphy for the gorgeous topper!
Cake stand – made by Suzanne Esper
Blossom Tulip bunny – Jellycat
]]>
Here at Chalming Cake Designs we were busy with orders right up until Christmas Eve and then again on boxing day to the New Year, I have managed to take a few days after New Years to reflect on my first year as a full time Cake Maker & Designer.
I left my full time chefs job at the end of November 2014 and then I got married to my wonderful & supportive husband, went on honeymoon, got back just in time to celebrate Christmas & New year with my new family and that took me straight into January 2015 where I sat and fell back into a pit of panic…’What have I done??’, ‘How could I leave the security of my job?’, ‘What if I fail?’, ‘I might not make any money this month, next month or the rest of the year???’, and the list went on. Two weeks I was battling with myself. Eventually I had to get up convince myself that I could only do my best and see what this year had in store, because if I’m honest if it wasn’t going to work I would just find a job (simple as that!), not the most positive way to start but WOW was it an eye opener!
I enrolled to do an accounting course and learn more about SEO (as I had a bit of time to kill, atlas I thought I did) and most importantly I decided to do a complete rebrand and name change, new job, new look, fresh feel! I worked very hard with Steph from ‘Over the Moon-creative marketing’ and the final results were incredibly rewarding! The reaction I got from old & new clients, friends and family were very positive and I cant thank Steph enough for all her hard work and dedication to my brand and completely understanding the vision I had. For her patience when she spent her time on a design for me to completely change my mind! I am very fortunate to have such a talented sister!
2015 also saw a wonderful relationship blossom between Chalming Cake Designs & Rhinefield House Hotel. I was so pleased to be asked to become a preferred supplier at Rhinefield House. With its beautiful grounds and breathtaking architecture, it makes the perfect location for a memorable wedding. I was invited to partake in the wedding open evenings that take place every 6 weeks. I have also made cakes for birthdays being celebrated at Rhinefield. So thank you for allowing me to be part of the vision for weddings at Rhinefield House Hotel.
Another very exciting relationship begun when I managed to track down an incredibly talented wood sculptor! Kevin at Lumber to Wonder he is a wood genius, and I feel fortunate that our paths have crossed. Wood cake stands are the latest craze and Kev takes on all my ideas and creates the most beautiful wooden cake stands which he hires or sells. With his gardening business GKA Garden Services he is always on the look out for unusual branches and has a keen eye for detail. We have a couple of projects booked in for 2016 and I can not wait to see what he creates next!
I launched ‘The simply Chalming Wedding Cake Range’ and had the pleasure of working with the very talented Stephanie Osmond Photography, she took the most gorgeous images of these simple yet elegant wedding cakes and really helped me to show them off to my clients.
I also joined My Wedding Fair Hampshire, fabulous concept and I look forward to doing more work with Kimberly & Rebecca in 2016. Thank you letting me be part of this fair!
In 2015 I was also picked for the Top 3 Bakeries in Southampton on the Three Best Rated and had my first cake image and my business name & details, published in a respected international magazine, Spring 2016 issue of Wedding Cakes magazine.
With all the highs there were a couple of hiccups. I will let you into the biggest one. It was the hottest day of the year I had a wedding cake, a 2 tier birthday cake, 100 cupcakes and 50 cake pops of different designs. I had spent the whole of the Friday getting everything done as quickly as possible because of the heat. Everything was going to plan, we had friends coming for dinner that evening, it was going to be a lovely Friday. Then it happened, an hour before my guests were about to arrive the chocolate started to melt, the cake pops were falling of the sticks. I was going to have to redo all the cake pops and start from scratch. So I entertained my guests, when they left I showered had a big cup of coffee and then started again. The redos were going well until I realised the heat was affecting my cakes aswell!!!!! I couldn’t go to bed knowing that the cakes that needed to be ready in the morning weren’t going to be perfect, so I had to to rip all the decoration off and start again! I worked until 4:30 that morning. I was a little tired the next day to say the least, but all the work was worth it and my clients were happy (this was the most important thing). So for every other order I borrowed my father inlaws air-conditioning unit and I created a cold room in our dinning room (I have a very patient Husband)
I also celebrated my 30th birthday this year, it was amazing!
On reflection of my first year in business I can honestly say that every little thing was worth it, even the worrying in the beginning, the worrying made it a reality and worry made me work harder to achieve this wonderful opportunity. Even in my busiest weeks where I was working all hours under the sun and was a little tired, I was happy and I absolutely love with my business!
I would like to take this opportunity to thank my wonderful husband Alan for all his support over this very important first year. For putting on an apron to come and stand with me at wedding fairs, for making the teas and coffees for my consults, for understanding why he has to sit alone at night because I am tinkering away in my office trying to keep ahead with all my orders, for making me feel so secure and allowing me to focus on my business and finally but by all means not least for listening to me talking cake all the time and helping me to make decisions about business and designs.
To all my family & friends for their constant enthusiasm to my work and sometimes having to sit and watch me work, I do love the company!
Thank you to all my clients past, present & future, it has, is & will be my absolute pleasure to create your cake and I couldn’t do this with out you!
I have had an incredible year and so far 2016 is really starting to take shape, I already have loads of beautiful weddings booked in!
I hope you all had a wonderful Christmas & New Years, I welcome 2016 and look forward to sharing all new designs with you.
Much love and thank you for reading.
Sonia xx
]]>
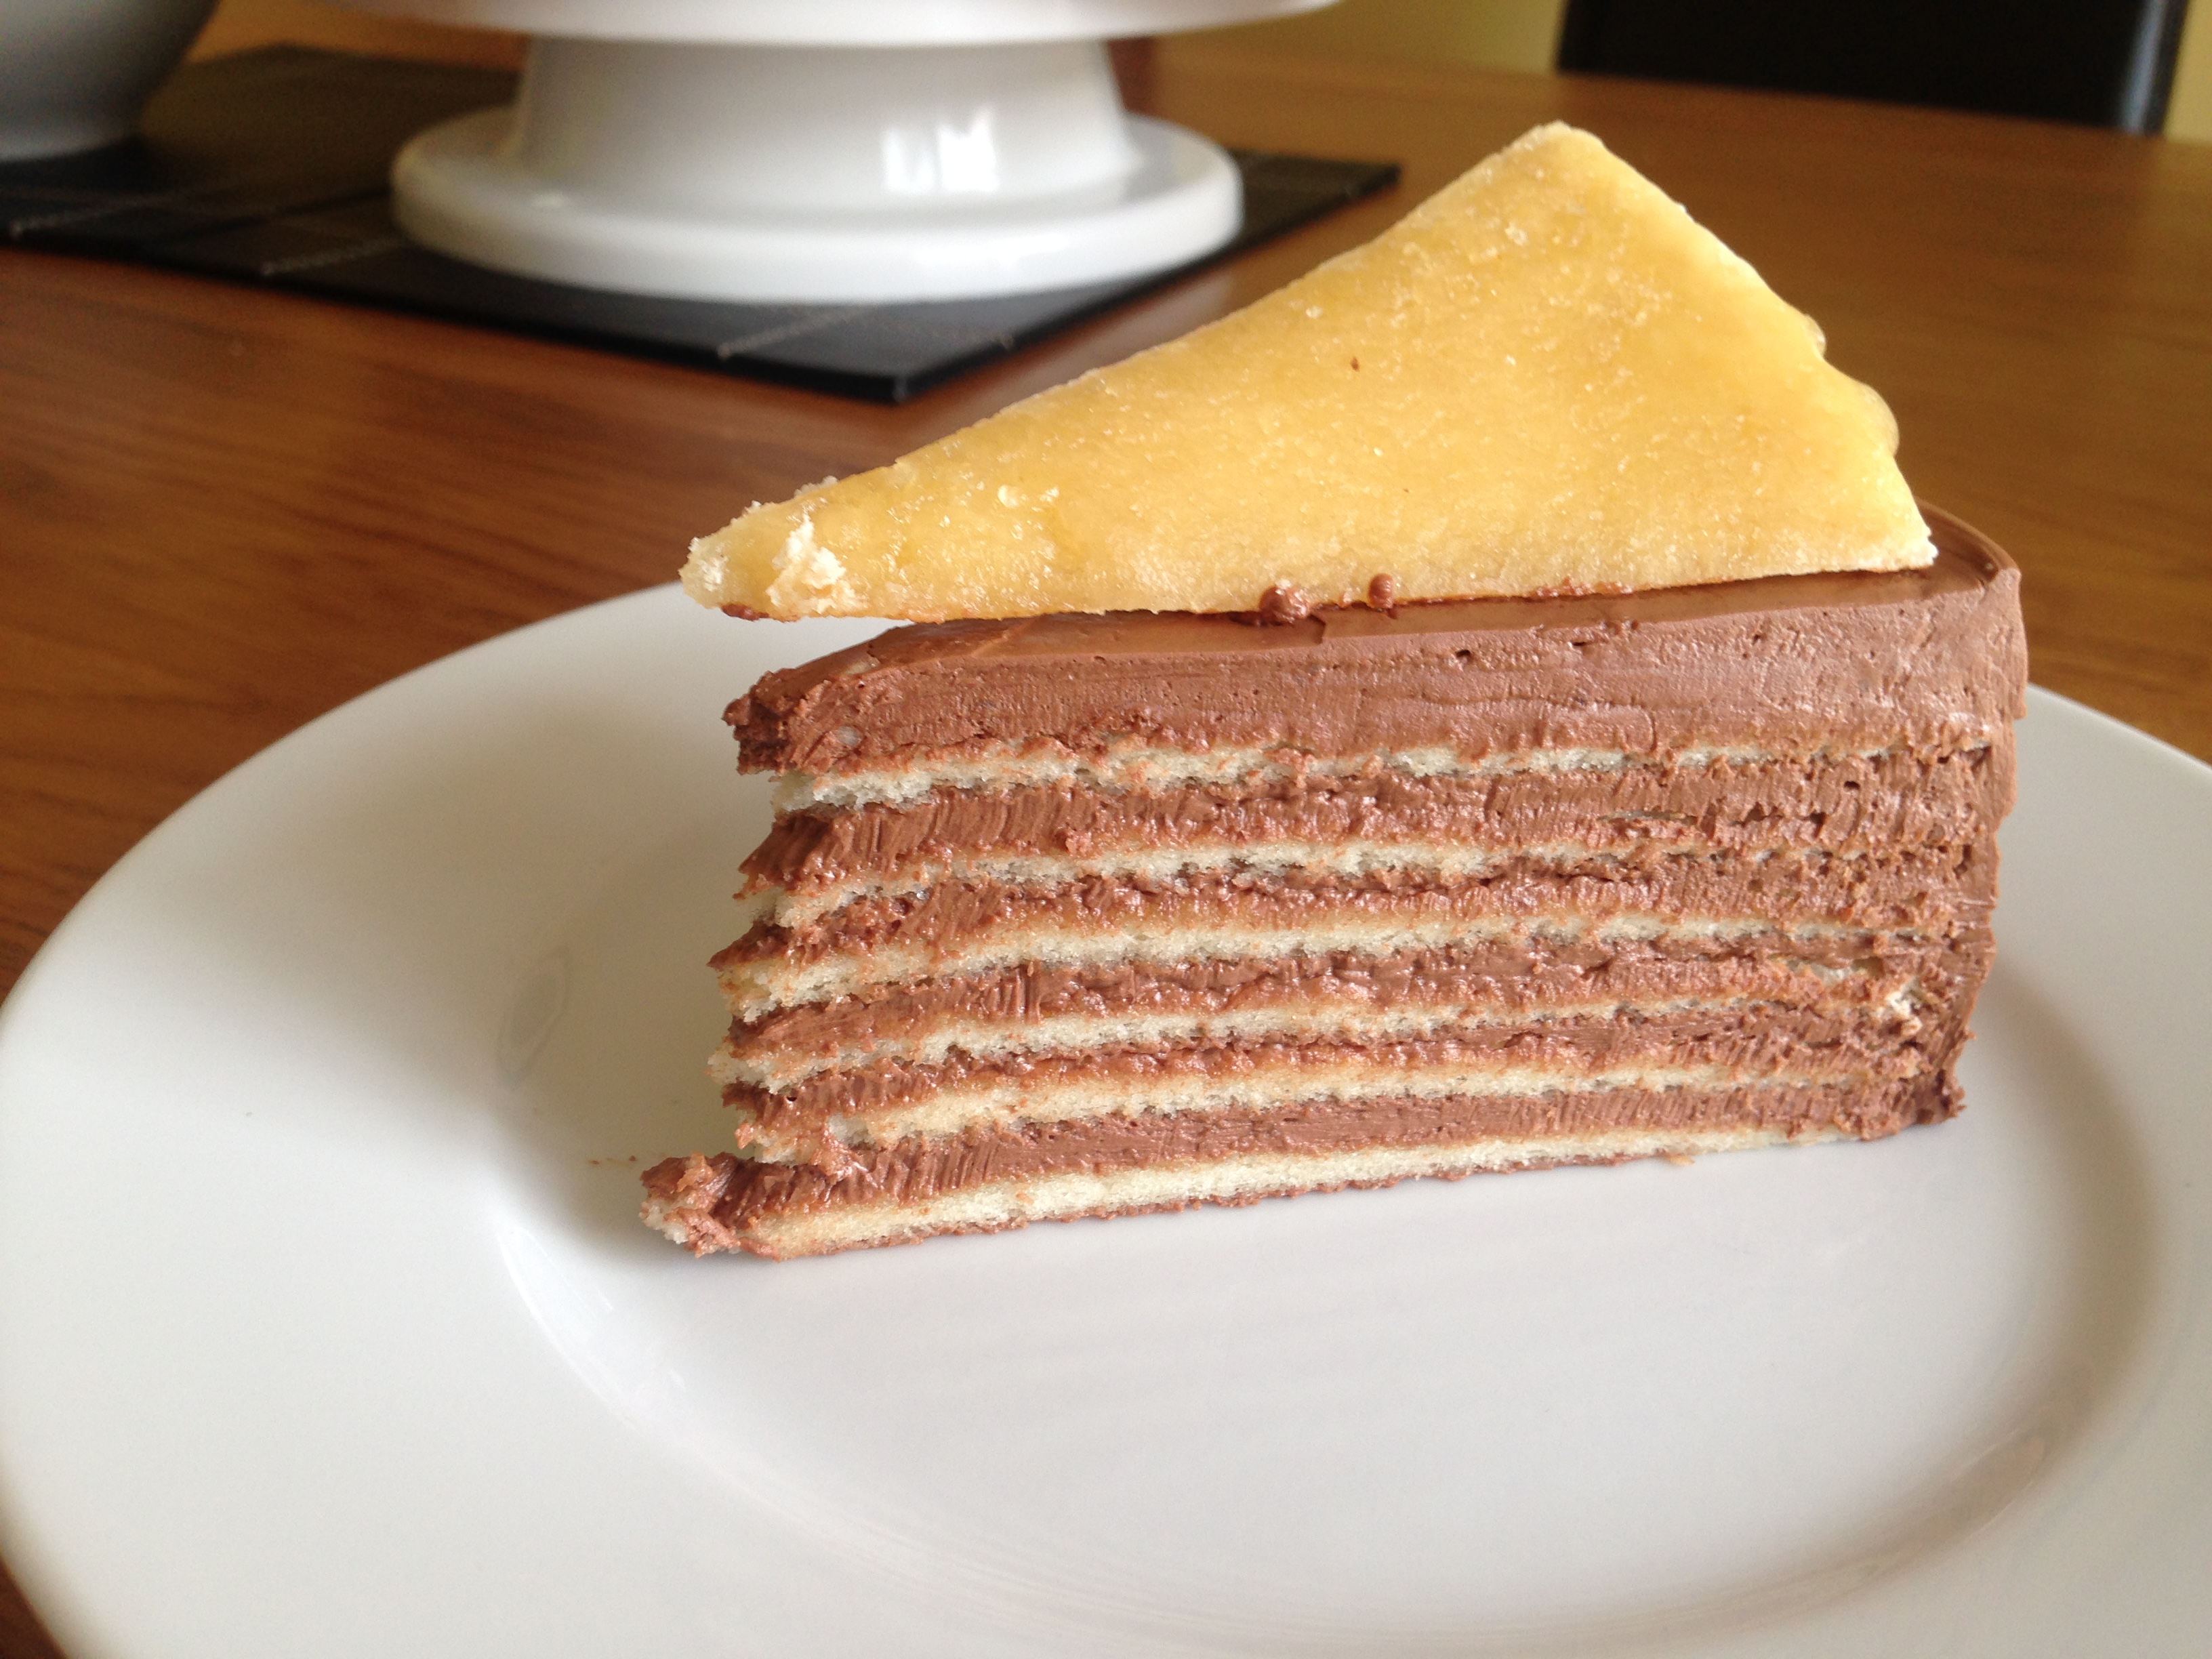
This wedding cake will receive two blog posts, this one where I will share my experience and the recipe used and the second one will be the final cake in all its glory!
Well where to begin!
When I was doing my research on the ‘Dodos Torte’ I learned that a Dobos Torte is a Hungarian Sponge Cake, layered in a Chocolate Buttercream and Topped with a Golden Caramel. When I discussed it with friends the first thing they would say was ‘That was one of the cakes they did on The Great British Bake Off’, Yes it was and this is what we relate this cake too. I love The Great British Bake Off, it gives myself an insight into old much loved, glorious cakes and I must be honest, I learn something new every year I watch it!
Now when I was looking for a recipe, I found some lovely blogs in America and the Joe Pastry Blog really stood out to me. The measurements were in pounds, cups and ounces. So I will put them into grams. There are some great tips on this recipe and I just feel more people should know them! So thank you for sharing Joe!
Set your Oven to 220 Degrees Celsius
Cake recipe
7 eggs, Separated
3 egg yolks
454 g Icing Sugar, sifted
113 g Plain Flour, Sifted
1 Tablespoon Lemon Juice
1/8 teaspoon Salt
Chocolate Buttercream
298g Semisweet or bittersweet Chocolate
298g Unsalted Butter
1 1/2 tspn Vanilla Extract
4 Egg Yolks
3 Tbpn Icing Sugar
Caramel Layer
149g Castor Sugar
5 Tbspn Water
16 – 20 whole hazelnuts (toasted)
The next time I make this recipe (which will be for the wedding in a couple of weeks), I will be melting the Chocolate for the Buttercream first, as this needs to be cooled (not set), and the great thing about this cake is it cools down so quickly that you can stack it almost instantly! So go on and melt the Chocolate first.
The Cake
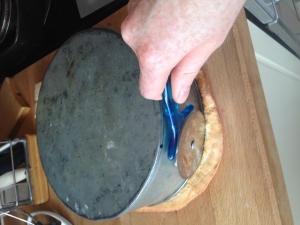
Now this is the first Nifty Idea and I would never have thought to use this, but the cake is baked on pieces of tin foil. You can do it on parchment paper but the problem there is the corners roll back on itself, but the tin foil stays perfectly straight! If you grease it correctly it easily comes away from the cake.
So take 7 square pieces of tin foil making sure you can fit an 8” round circle in the centre and giving it a bit extra on the side. I use the board I will stack the cake onto to draw the circle in the centre of the tin foil.
Rub/brush butter within the circle and going over the edge by about 5cm then sprinkle icing sugar on top using a sieve, making sure all the butter has a light sprinkling over it.
Shake off any excess back into you icing sugar tub/bag. Now you should have 7 pieces of greased tin foil that have a light dusting of icing sugar and you can lay those on top of each other to give your self more space (did I mention you need a bit of space for this cake!)
If you are using a machine use the paddle(I have a kitchen aid, so I use the flat paddle), add your egg yolks in the mixing bowl and put your mixer on high until they are pale in colour. Reduce your speed and add your sifted Icing Sugar a spoonful at a time. Once it is l added put your mixer on high and beat for 5 minutes. You will see the mixture is lovely and thick and if you lift the paddle it will look like ribbons when it falls.
Turn your mixer down and add the flour a spoon at a time. Once that is all in, turn the mixer up and beat for 5 minutes. Stir in the Lemon Juice.
I have a separate hand held mixer which I use for the Egg Whites, add the salt to the egg white and whip till Stiff Peak. Add a few of the stiff Egg Whites into your Egg Yolk mixture to loosen it up and then fold the rest of the Eggs White in.
Lay your Tin Foil layers out and start spooning the mixture into the Centre. Once all the layers have equal measurements of mixture on them start spreading it out to your lines till you end up with lovely circles on all 7 pieces.
I put my prepared tin foil onto a flat tray, you can put two layers in at a time and bake them for 5 minutes or until they are golden brown. If you are using the same trays for all the layers, make sure you work quickly as the raw mixture becomes fluid pretty quickly cause of the heat, so you don’t want too much movement before it goes into the oven.
As you pull them out have a wire rack ready to turn them out on to. Pop the next layers in, then go back to the baked layers and start pulling away the tin foil (if the greasing is correct this should come away easily), then move it over to a board lay your 8” board onto and trim away the edges to give you a perfect circle (although I have just seen while laying out my images that I used my tin, but I would use the board next time). I then played each layer between greaseproof on top of each other to prevent sticking. Continue this process (Cause it is a bit of a precess!!) until all the layers are baked, cooled, trimmed and stacked. Which should take you all of 20 minutes if you are doing two layers at a time 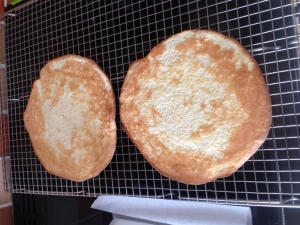
You should now have layers perfectly stacked between greaseproof layers. Its a very satisfying sight, trust me!
Chocolate Butter cream
Now focusing on the buttercream, (you will be happy that you have melted that chocolate as it should be pretty cool).
In your mixer with your paddle cream the butter. Once that is creamed add the Egg yolks and Vanilla. Next add the sugar and the cooled chocolate and mix thoroughly.
Now its time to put all your work together.
Take your board (the one you were making your circles with) and lay that down, put a thin layer of the buttercream and lay your first sponge layer, put a layer of buttercream on top of the first layer of sponge, keep going until you have done 6 layers. Save the 7th layer for your caramel.
Once you have sandwiches all you layers except one, use the last of the chocolate buttercream on the outside of the Torte.
Put your Torte aside and start looking at your caramel, place your last layer of sponge on parchment. Place the sugar and water in a pan and bring to the boil. I have a sugar thermometer and let the sugar go to hard crack. Lovely Caramel colour. You need to work quickly here, pour it over the sponge and take a spoon and make sure the caramel reaches the edges. Any caramel that has gone over you can trim away once it has gone hard. Once it has semi cooled take a sharp knife and cut it into 8 wedges. Any left over caramel I quickly covered the toasted hazel nut in the sugar.

To complete your design arrange the caramel wedges with a hazelnut underneath each wedge, creating like a fan blade effect. Store in the refrigerator!
]]>
They wanted Strawberrys & Cream to feature in their wedding cake but wanted a mixture of cupcakes and cake pops.
So the cupcakes were Strawberry cupcakes with a Vanilla buttercream and to offer a different flavour they went for Chocolate cake in their cake pops.
We used the colours of Wimbledon for the Cupcake Stand and the cupcakes cases and decoration. The cupcake frill softened the whole idea and bought an elegant finish to their cupcake display.
The cake pops were designed to look like tennis balls.
The venue was ‘Skylark Golf & Country Club’
Congratulations to Gemma & Matt. Loved designing & making your cupcake tower! Thank you for allowing me to be part of your wedding day!
Chalming Wishes
Sonia
xx
]]>Their venue was ‘The Pig Hotel – New Forest’, the room they had there reception in, is a Victorian greenhouse, with the white Lilacs, Ranunculus & Sweet Peas in the centre of the wooden tables.
It all looked gorgeous!
The cake flavours were a mixture of Red Velvet Cake & Chocolate Cake
Silver leaf featured in the decorations. We worked with their invitation to create the initials on the middle tier, with a few silver accents, and then the white royal icing stencil ontop of the silver leaf at the base of the cake.
The top had a few White Sweet Peas flowing down the top tier.
Beautiful venue, beautiful cake, lovely couple.
I wish them every happiness in their future together and many Congratulations from Chalming Cake Design.
Chalming wishes
Sonia
xx
]]>
Now the day before we were learning different sponge cakes and we had to make a Geniose sponge cake, and I must have tried it about 6 times and every time it sunk in the middle and I just couldn’t get it right by the end of the day I was feeling pretty deflated and knowing me was probably a little tearful!
So when I was told to make the Geniose on the Friday morning, I thought it was some kind of cruel joke and I wasn’t laughing…nope I looked at the equipment and ingredients in dread, but I conquered and baked some beautiful sponges!
Now this introduction is important because exactly the same thing happened to me the first time I made Red Velvet Cake, and the second time and I think the 3rd time…to the point I was going to get my sister to make the RVC if anyone wanted one or I just wouldn’t offer it!
The more consults I had the more I realised my clients love Red Velvet Cake so I had no choice but to get it right!
So here is my Red Velvet cake, with a couple of tips and the Recipe is from
The Hummingbird Bakery Cookbook
120g unsalted butter at room temperature
300g caster sugar
2 eggs
20g cocoa powder
4 tbsp red food colouring (I found that 40g of Dr Oetker Gel Food Colouring in Bright Red worked well)
1 tsp vanilla extract
240ml buttermilk
300g plain flour
1 tsp salt
1 tsp bicarbonate of soda
3 tsp white wine vinegar
Preheat oven to 170 deg C / 325 deg F (150 deg C fan assisted). The recipe suggests using three 20cm cake tins, but I adjust it to the size OF the cake I need.
I have used the Dr Oetker Gel Food Colouring, but found the getting the amount I needed was a bit of a run around to different stores and buying all they had and then getting out of the tubes I always felt I might be wasting and it just took too long to get it out of the tubes.(Time is like gold dust in my world!)
Just make sure that you avoid any ‘natural’ colours(one of the mistakes I made).
I used SugarFlair, Christmas Red (this was a HUGE jar, but I make quite a lot of these now), the consistency is perfect and I use a little less because the colour is so strong!
The process:
1. Cream together the butter and sugar until pale and fluffy, and then gradually incorporate the eggs.
2 Separately, combine the cocoa, red food colouring and vanilla to form a paste, and combine with the egg mixture.
3.Gradually add the buttermilk and flour, adding a little of each at a time until fully combined.
4. Add the salt, bicarbonate of soda and vinegar and ensure all ingredients are well mixed.
Divide between the cake tins (whether you are using one, two or three), and bake for 20-25 mins in the oven. When I am using one, depending on the height I will bake up to 45 minutes.
Icing:
Because my cakes are served at Ambient temperatures, I don’t use a cream cheese icing, but using a Vanilla Buttercream Icing instead, it tastes just a delicious and a safer alternative!
This is The Hummingbird Vanilla Buttercream
250g icing sugar , sifted
80g unsalted butter, at room temperature
25ml whole milk
2 Drops vanilla extract
Instructions
1 Beat the icing sugar and butter together in a freestanding electric mixer with a paddle attachment (or use a handheld electric whisk) on medium-slow speed until the mixture comes together and is well mixed. Turn the mixer down to slow speed.
2 Combine the milk and vanilla extract in a separate bowl, then add to the butter mixture a couple of tablespoons at a time.
3 Once all the milk has been incorporated, turn the mixer up to high speed. Continue beating until the frosting is light and fluffy, at least 5 minutes.
4 The longer the frosting is beaten, the fluffier and lighter it becomes.
So in conclusion if I was to ever give any advice, I would say don’t give up and keep trying till you get it right even if there are tears.
Happy baking!
Chalming Wishes
Sonia xx
]]>They had a selection of flavours for their wedding cake.
Lets start at the top.
Top tier – Fruit Cake
Second Tier – Vanilla Cake
Third Tier – Chocolate Cake
Bottom Tier – Lemon & Poppyseed Cake
The decoration was a gorgeous mix of White and Pink with lots of little flower blossoms and flecks of gold with one gold tier.
The tiers were different sizes which made this cake look extra gorgeous!
From Chalming Cake Designs we wish them both every happiness in their future together and thank you so much for allowing me to contribute to your gorgeous day.
The venue was at Church Paddock Fishery, it was just beautiful!
Chalming Wishes
Sonia x
07917667255
Bespoke Wedding Cakes, based in Hedge End, Hampshire , UK
]]>